On average, 10 to 35% of people who register for a free webinar do not participate.
Considering how much time it takes to organize a webinar (content, presentations, teasers, social network posts, articles)... it has to be worth it!
The people who sign up are targeted leads that come to you. Activate them immediately 🎯
From registration to commercial follow-up, you can automate some actions to transform your online event into a genuine 100% automated prospecting operation.
Each step has its importance 😎 and its tricks!
As a bonus, we share with you our detailed workflow at the end of the article 🙊
Registration: the key moment! 🗝️
When visitors come to your landing page, the challenge is to convert them into participants.
To do this, they will go through the inevitable registration form, and this is not a simple, intermediate tool. It is THE key moment! 🗝️ This form is your best friend or your worst enemy.
📍 On average, 27% of people abandon their shopping cart on an e-commerce site if the order process is too long or too complicated.
If the form is too long, the prospect will abandon it when seeing the mountain of fields to fill in.
💡 The trick is to limit the registration form to three pieces of information: last name, first name, professional email. It takes only 10 seconds to register: simple, fast, efficient.
You will see that these 3 pieces of information are enough to carry out many prospecting actions before and especially after your event.
Preparing prospecting actions around a webinar
The keyword: personalization!
Automatically enrich the data of generated leads
Getting webinar registrants is one thing; converting them into paying customers is another.
The first thing to do is to get more information about the registrants. The more you know about your participants, the more you will personalize the message and convert them.
From the first name, last name, and professional email of the contact obtained at registration, Dropcontact checks the validity of the email but also enriches the data by adding titles, LinkedIn profile, or social networks. It thus becomes ultra-simple to personalize the relationship and segment your database for your campaigns.
To obtain this result, you can use several methods:
1. Use Zapier to automatically enrich and check your attendee database upon registration on a Typeform, Eventbrite, LiveStorm, or Instapage form. We show you how to do this in detail in the use-case below 🙊
👉 Several zap templates for all your use cases.
2. If you use Pipedrive, Salesforce or Hubspot, BINGO! You can integrate Dropcontact directly, import your list of subscribers, and their data will already be enriched and verified in your CRM. If one of your registrants was already in your database, the duplicate would be detected and merged automatically 🤩
👉 Pipedrive integration / Salesforce integration / Hubspot integration
3. Drop your registration file on the Dropcontact application to obtain a complete database of participants.
Pre-qualify leads and segment your audience
To save time and, above all, efficiency on follow-up emails and the following commercial relaunches, carry out an initial qualification of the leads obtained.
Create several segments from this database; you could use to customize your future actions. For example, you can segment according to...
- Industry sector: your leads come from a variety of industries, with different expectations.
- The company's size: the message addressed to a person is not the same depending on whether they work in a start-up or a large group.
Create multiple versions of email campaigns for each segment: the more humane the message, the more personally engaged the prospect will feel, the more participants you will have 😉.
Do the follow-up post-webinar as soon as possible.
Make the most of the leads you get: it's easier to use the leads you already have rather than looking for new ones, isn't it?
💡 Little tip (great result): just after your event, add the participants on LinkedIn! By inviting your prospects on LinkedIn, they can ask their questions directly via chat. Easier to start a conversation 😉
🧷 Tip: you can automate the sending of LinkedIn invitations with tools such as Captain Data, Dux-Soup, or TexAu.
A few days after your event, send a detailed summary to the participants, and feel free to drag a link to a calendar, like we just did ⚡️.
Case study: a webinar that converts leads into prospects
Demonstration by example! Here is an effortless workflow to set up to go further and optimize lead generation as soon as you register for the event.
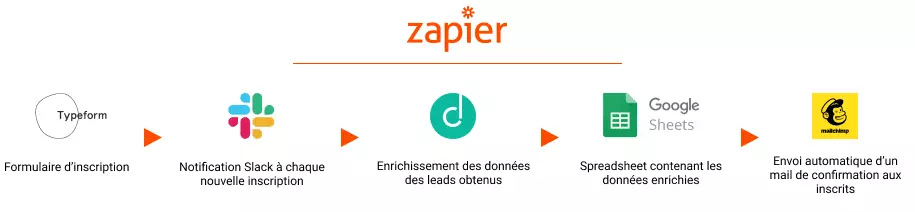
1. Trigger the zap at each new entry
In this example, we use Typeform, but this zap will also work with other applications present on Zapier such as Eventbrite, Livestorm, Instapage...
Create a registration form with 3 entries with Typeform (last name, first name, professional email).
Create a zap, connect your Typeform account, and select the trigger "New Entry in Typeform".
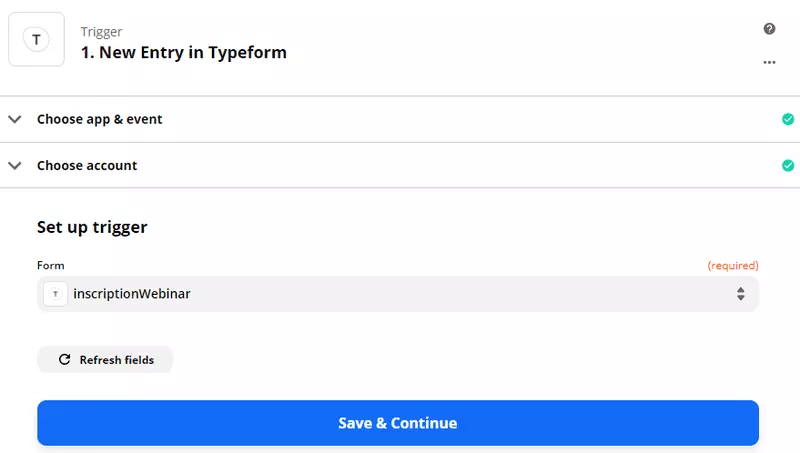
From each new entry in the Typeform, the zap will be triggered ⚡️.
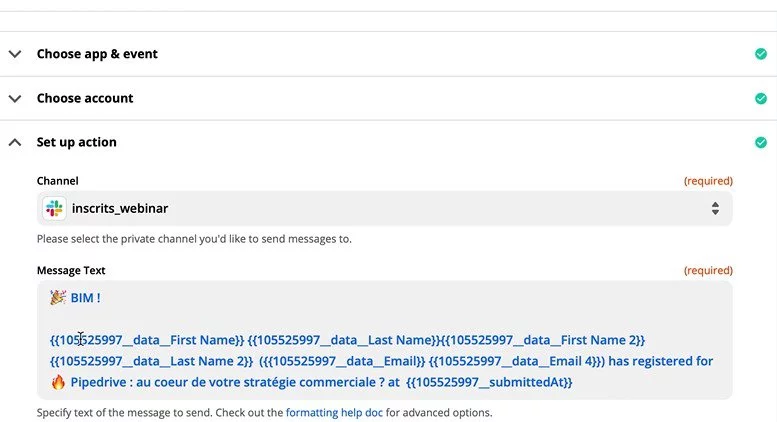
2. Alert at each webinar new registration
Set Slack as the second step in the chain.
Here you will ensure that you will receive a notification each time a new person registers for your webinar. That way, you can follow the progress of the registrations and you'll be sure not to miss anything! 👌
Create a dedicated channel on Slack.
- In the first section "Choose app & event", select "Send private channel message".
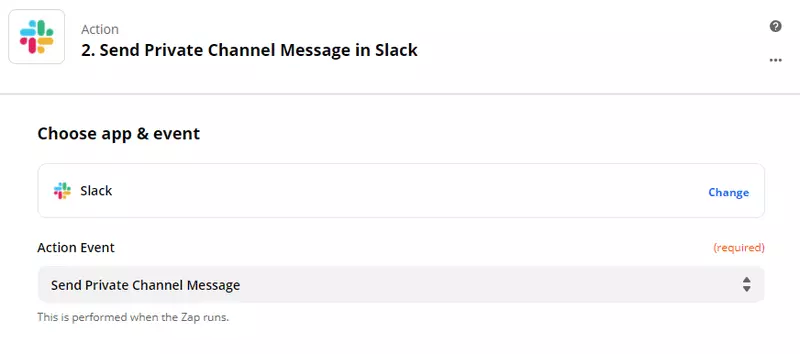
- Connect your Slack account.
- In the "Set up action" section, select the dedicated slack channel.
- Define the message you want to send. You can personalize it with the information of the registered prospect.
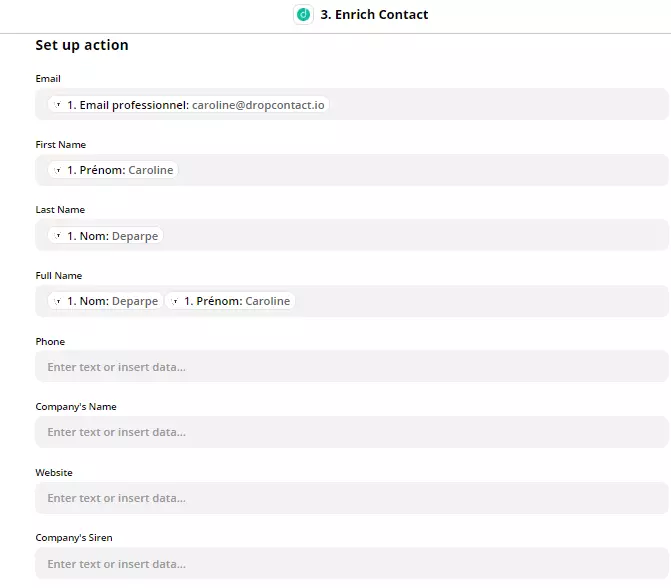
3. Data enrichment of webinar participants
Now it's time to enrich the data of the webinar registrants automatically! Define Dropcontact in the third step of the zap.
- In "Choose app & event", select Dropcontact.
- In "Action event", select "Enrich contact".
- Connect your Dropcontact account and enter your API key.
- In the "Set up action" section, match the 3 Typeform fields (First name, Last name, Professional email) with the Dropcontact fields.
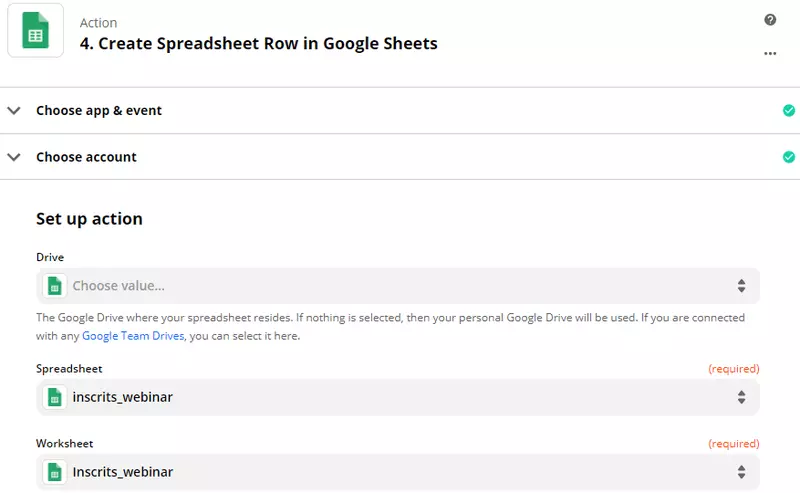
4. Generate a complete database of registrants
This step will allow you to automatically fill a Google Sheets file with the enriched information of your registrants.
Create a spreadsheet that will be used to receive this information. In the column headers, indicate all the desired information: last name, first name, email address, of course, but also phone number, LinkedIn profile URL, company LinkedIn profile URL, website, and more information for French companies).

Back on Zapier, set up Google Sheets in the fourth step of the chain :
- In the "Action event" section, select "Create spreadsheet row". With this, a new row will be created for each new registration.
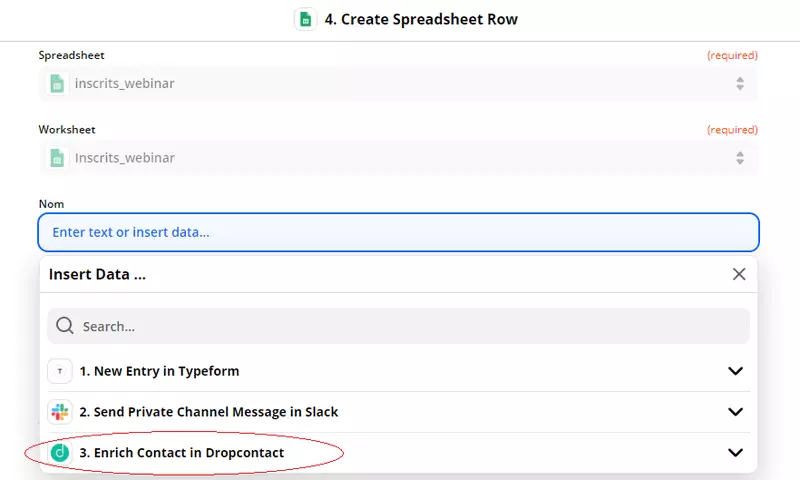
- In the "Set up action" section, connect the spreadsheet.
- Then fill in the fields corresponding to the columns of the spreadsheet. The information was automatically found by Dropcontact. For each of the fields, select "Enrich contact in Dropcontact" and then the corresponding data.

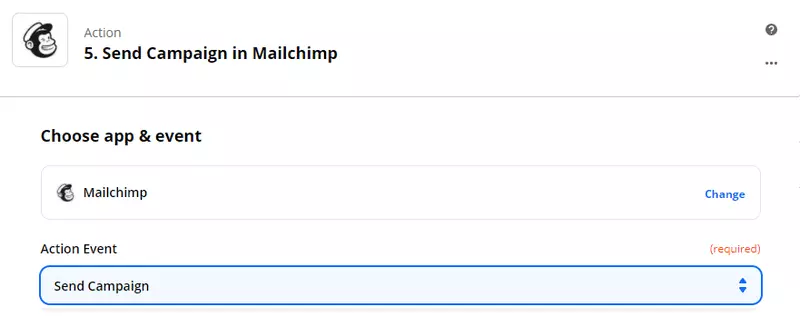
5. Sending of an automatic and personalized confirmation email
Define Mailchimp in the fifth step of the zap (or another emailing solution).
At the end of this last step, you will automatically send a personalized confirmation/reminder message.
First of all, in Mailchimp:
- Create a campaign and write a confirmation email using the personalization variables.
- For recipients, paste the link from the Google Sheets file and define the email column.
Back to Zapier :
- In the sub-section "Action event", select "Send campaign".
- Log in to your Mailchimp account.
- In the "Set up action" section, select the campaign.
And here is a fully automated and optimized webinar 👌. You receive a notification of the registration process, you get quality data, and your prospects receive a confirmation email... all automatically and effortlessly from you!
🔥 By applying the tips described in this article, you are sure to get a maximum number of registrants and make the most of them for your future prospecting operations.
There's nothing left to do! 🏁